Overview of Integration
We have partnered with SAP SuccessFactors to provide our Stepstone Connect solution which lets jobseekers apply seamlessly for jobs posted on Stepstone Group job boards. All applications will be passed directly to the SuccessFactors ATS, with confirmation of the source of this application.
How does this work?
Stepstone Connect is a free-to-use technology that enables a seamless integration between our StepStone Group job boards and SuccessFactors. When integrated, this will enable the automatic transfer of applicant data and CVs into your SuccessFactors ATS.
This works by simplifying the job application process and removing the need for a candidate to re-enter their information on an external web form. We pull the screening questions and additional requirements from the SuccessFactors careers site and ask the candidate to provide this information as part of their application on our site.
This in turn leads to a much higher application completion rate, greatly reducing candidate drop-off in the application process.
We are also able to track candidates as they move through the recruitment funnel, using candidate disposition data from SuccessFactors. This enables us to determine how many applicants of value we are providing you, therefore giving you greater insight and visibility into our performance.
Candidate Process
When a candidate has completed their application at our end, we will create a candidate profile within SAP for them and attach their application to this.
They will receive an email confirming their application has been received and will need to set up a password to access this. You can configure the data within this email within SAP.
You will then be able to manage their application within SAP as normal.
Requirements
To activate Connect, clients are required to provide the following information from SuccessFactors:
- Link to log in to SAP test platform
- Link to job requisition in SAP test platform
- API Key for OAuth2.0 (see step 2 below)
- Copy of the following Recruiting Templates: (see step 3 below)
- Candidate
- Job Application
- Job Requisition
- Confirmation of IP Whitelist (see step 4 below)
- Job Application Source value (see step 5 below)
- Application Stage Setting (see step 6 below)
- Link to Privacy Policy (see step 7 below)
- Candidate visibility preference (see step 8 below)
You will find this information, as well as further explanations for each point, by following the instructions further below in your SuccessFactors ATS.
Please send the above information to one of the following contacts, depending on your job board:
| Country | Job Board | Contact Email Address |
| Continental Europe | Stepstone DE | connect@stepstone.com |
| UK | Totaljobs / Caterer / Jobsite | connectuk@thestepstonegroup.com |
| Ireland | Irishjobs, Jobs.ie, NIJobs | connectuk@thestepstonegroup.com |
Please note, that administration access is required to enable you to complete these steps.
Steps to integrate and enable
Step 1: Create a user
Here we will set up a new user with the privilege to access OData API permissions. This involves the following steps:
- Create a new employee
- Create a new permission group
- Create a new permission role
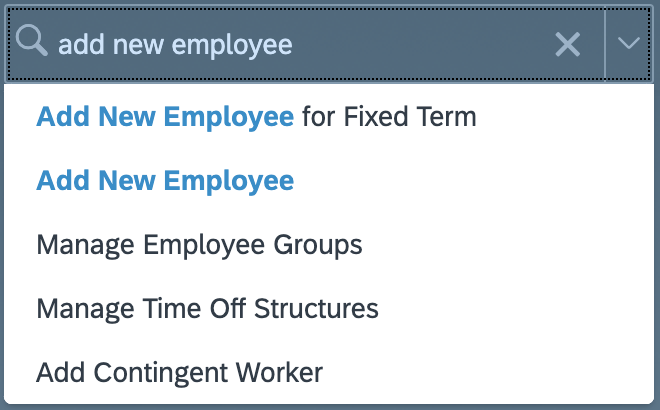
Step 1A: Create a new Employee
- Log in to your SuccessFactors admin account.
- In the top right box, type “Add New Employee“.
- Select “Add New Employee” from the search results:
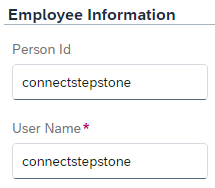
- In the Employee Information box, enter the following parameters:
- Person Id: connectstepstone
- User Name: connectstepstone
IMPORTANT:
The Person Id and User Name must have the same value when creating new employee dedicated for the Connect integration. While this is counterintuitive, it is required in order to assign the OAuth integration with Connect user. Binding the user to integration requires providing User ID, while generating the SAML assertion requires user name. User ID value is not editable and is copied from Person Id (which is autogenerated) during creation. Unfortunately, this cannot be changed afterwards, so updating Person Id for existing user will not fix the issue as the original (autogenerated) userId will remain unchanged. Setting person ID and user name (and effectively user ID) to the same value is a workaround – different methods (SAML assertion, client app configuration) will use data from different sources, but the string values will match.
- Fill in all remaining fields with any sensible values and click “Continue” to move to the “Personal Information” page.
- Fill in the fields under “Email Information” as below:
- Email Type: Business
- Email Address: please use an email of your choice that will be associated with the integration (the screenshot below with our Connect email is for example purposes only – please do not use our email)
- Primary: Yes

- Continue to fill in all required fields on the “Personal Information” page and click “Continue” to move to the “Job Information” page.
- Fill in all required fields on the “Job Information” page and click “Continue” to open the final page title “Compensation Information“.
- Fill in all required fields on the “Compensation Information” page and click “Submit” to complete the employee creation process.
Please Note: The newly created user will not have access to any sensitive data.
- When completed, a confirmation screen will display. Click on the “Back to: Admin Center” option in the top left corner of the screen to return.
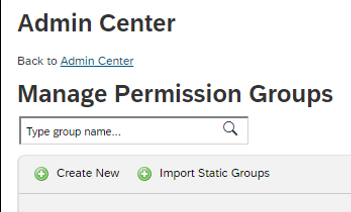
Step 1B: Create a new Permission Group
- As an admin user in the top right search box type “Manage Permission Groups“.
- Select “Manage Permission Groups” from the search results.
- Click the “Create New” button.
- In the Group Name field enter “Connect API Permission Group“
- Select “Username” from the People Pool dropdown and then add the newly created “connectstepstone” user into this field
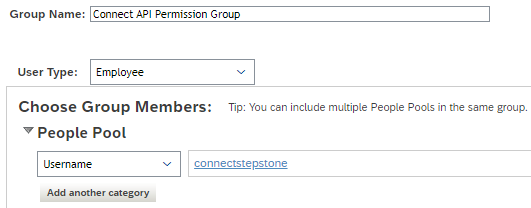
- Click Done to complete this step and return to the Permission Group page.
Step 1C: Create a new Permission Role
- As an admin user in the top right search box type “Manage Permission Roles“.
- Select “Manage Permission Roles” from the search results.
- Click the “Create New” button.
- In the Role Name field enter “Connect Integration Role“.
- Under Permission Settings, click the Permission button.
- Choose “Manage System Properties” on the left, then tick “Picklist Management and Picklists Mappings Set Up“.

- In the same window, choose “Manage Integration Tools“, then tick “Allow Admin to Access OData API through Basic Authentication” and “OData API Attachment Import“.
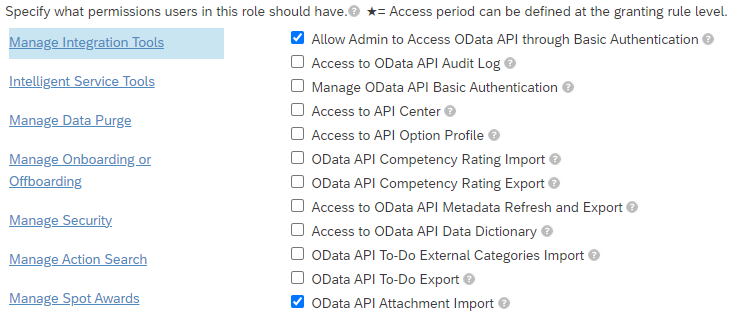
- Next, choose “Recruiting Permissions” and select the following:
- OData API Application Create
- OData API Application Export
- OData API Candidate Create
- OData API Candidate Export
- OData API Candidate Update
- OData API Job Requisition Export
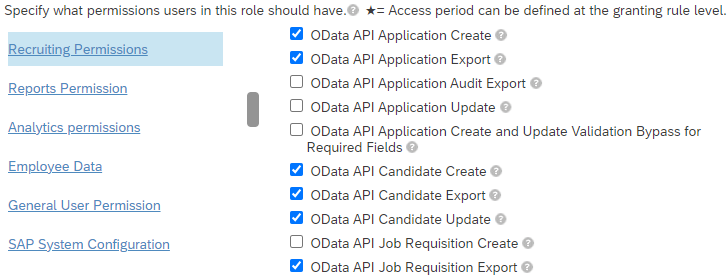
- Click Done.
- On the Permission Role Detail page, under “Grant this role to…” click the “Add” button.
- Search for the “Connect API Permission Group” in the search box:
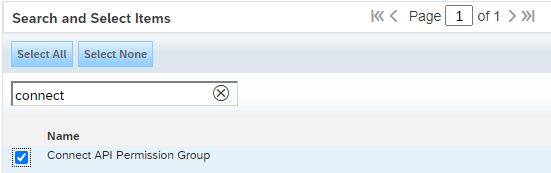
- Tick the box and click Done.
- You should now see the following screen:
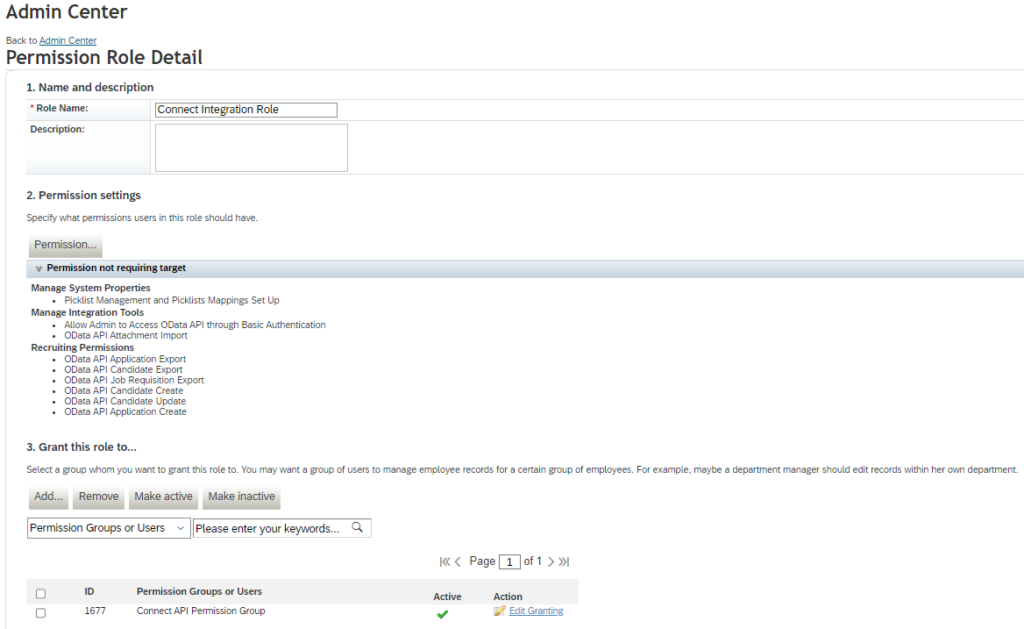
- Click the “Save Changes” button at the bottom right of the screen to complete this step.
Step 2: Set up OAuth2.0 Authentication
This is the preferred and most secure method of authentication for this integration via SAP. Your Stepstone contact will share a X.509 Certificate with you, to enable you to create an API Key.
To set this up, please follow the steps below:
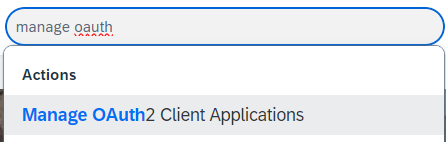
- As an admin user in the top right search box type “Manage OAuth2 Client Applications” and then select this from the results shown.
- Click “Register Client Application” and the fill the form with following values:
- Application Name: Stepstone Connect (can use any name here)
- Application URL: https://stepstone.com
- This parameter is required, but its value is not used in the authentication process, so any value can be provided here.
- Bind to Users: this is optional
- User IDs: connectstepstone
- Add here if Bind to Users is ticked
- X.509 Certificate: Open cert.pem file in a text editor, copy certificate value (the text between —–BEGIN CERTIFICATE—– and —–END CERTIFICATE—–) and paste it here.
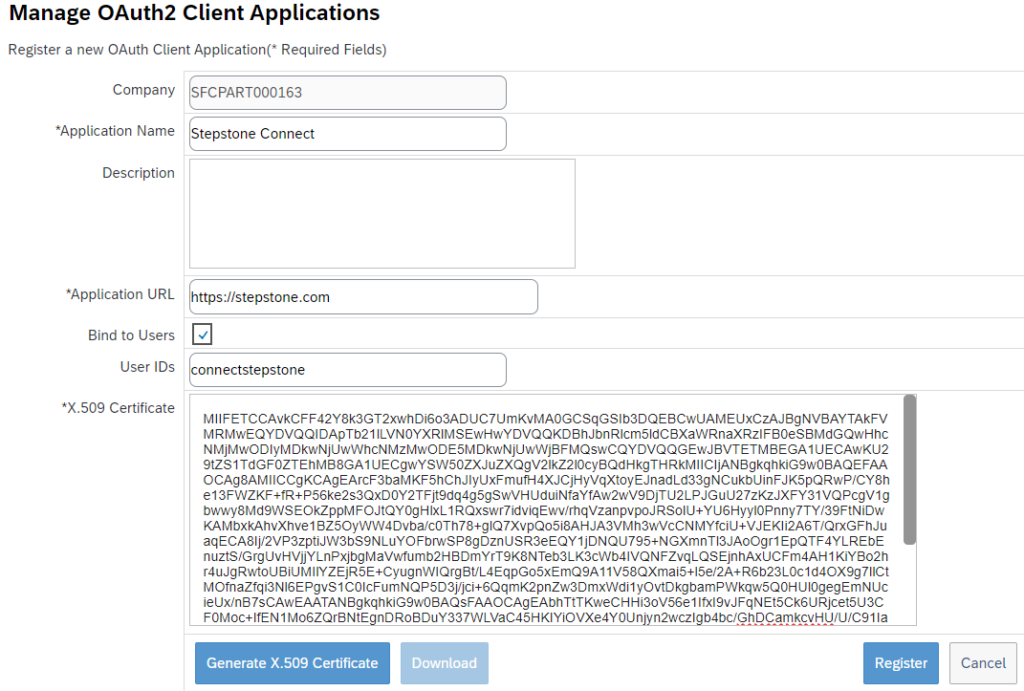
- Click “Register” and the new client application will now show on the list.

- Click “View” and then copy the API Key generated for the client application.
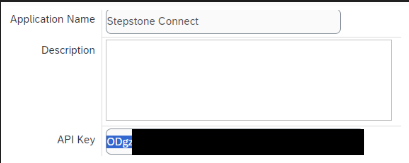
- Save this value for later to send with the other information requested in the Requirements section.
Step 3: Export Templates
Here we will retrieve copies of the following templates:
- Candidate Profile
- Job Application
- Job Requisition
We need to upload these into our configuration to ensure we can collect the job requisition data, show the correct questions to candidates and send their data into SAP successfully.
To do this, please follow the steps below:
- As an admin user in the top right search box type “Manage Templates” and then select this from the results shown.
- Click on “Recruiting Management” tab.
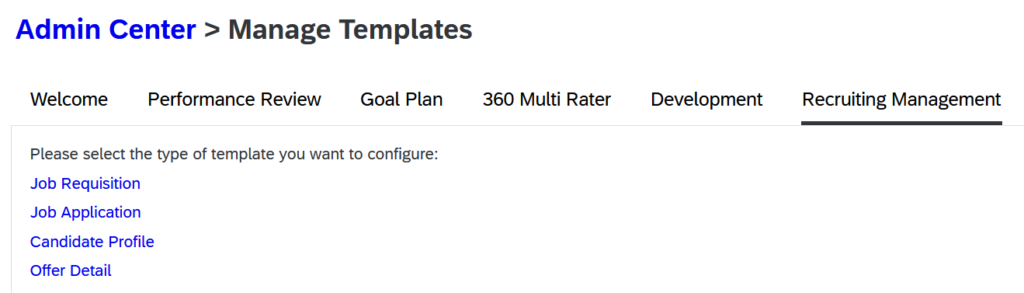
- Click on “Job Requisition“.
- Tick the box next to “Show Active Templates Only“.
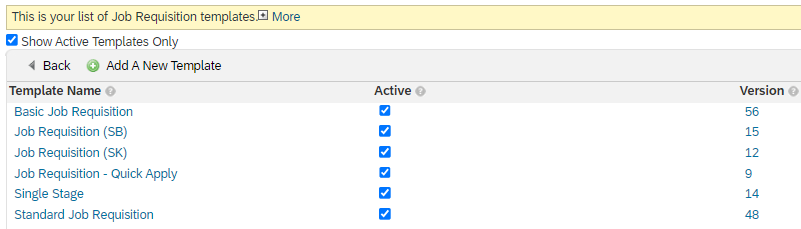
- Click on the number in the “Version” column to bring up the list of templates.
- For the most recent version of the template, click “Download” in the “XML” column.
- Once downloaded, scroll down the page and click the “Close” button.

- Complete this step for all active Job Requisition templates.
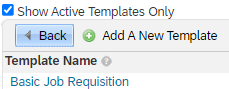
- Click the Back button:
- Complete the steps above for all “Job Application” and “Candidate Profile” templates.
- Once these steps are complete, save these templates for later to send with the other information requested in the Requirements section.
IMPORTANT – Please Note:
If any new templates are created or changes are made to existing templates, please send the copies to us. Failure to do this may result in the integration ceasing to support your offers.
Step 4: IP Whitelisting
Here we will whitelist Stepstone IP addresses in the SuccessFactors system. This is necessary to allow us access to send and receive data within your instance.
To do this please follow the steps below:
- As an admin user in the top right search box type “Password and Login Policy Settings” and then select this from the results shown.
- Click on “Set API login exceptions“.
- Click “Add“.
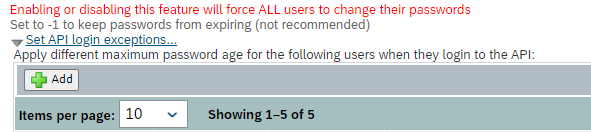
- In the “Create New User Security Setting” box, enter the following information into the fields:
- Username: connectstepstone
- Maximum password age (days): -1
- IP address restrictions: 34.240.96.217, 34.253.122.1, 52.30.143.134, 34.255.248.91, 34.246.112.136, 34.255.82.25, 52.51.35.59, 54.73.130.89, 34.251.6.61, 52.208.218.105, 54.216.205.215, 52.214.10.241, 54.170.128.121, 63.34.221.32, 217.110.101.180, 212.36.185.6, 104.30.133.19, 104.30.134.85
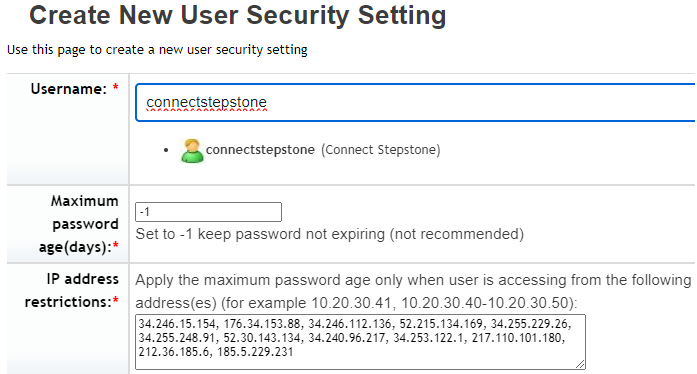
- Click “Save and Close“.
Step 5: Extracting Job Application Source
Here we will check what value is set up for the Stepstone job board(s) you use in SAP. We will send this value with every application to ensure they are correctly attributed to our job board.
There are a couple of ways to do this, which are outlined below:
Method 1: Extract from offer URL
We can extract the job application source ID from your published offer URLs if they contain one of the following query parameters:
- jobPipeline
- utm_source
Method 2: Extract from Source / Candidate Source lists
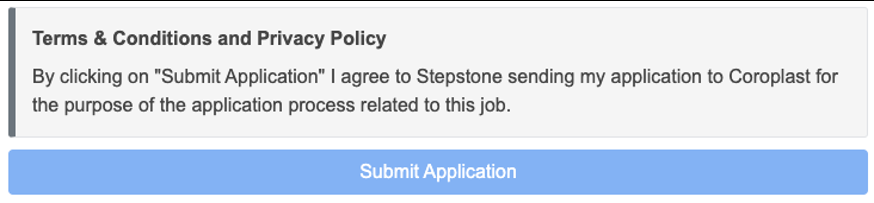
If you use a screening question which asks candidates where they have applied from, we can use these values. We would need to know exactly how this is defined in your system. Please see an example below:

Method 3: Send generic values
If the above 2 methods are not valid, then we will send each job board name (dependant on where the role is published) in the following format into SAP:
| Country | Source Values |
| Continental Europe | StepStone DE, StepStone AT, StepStone BE, StepStone NL |
| UK | Totaljobs, Caterer, CatererGlobal, CW Jobs, Career Structure, Retail Choice, Milkround |
| Ireland | IrishJobs.ie, Jobs.ie, NIJobs.com |
Once you have the values, save these for later to send with the other information requested in the Requirements section.
Step 6: Check Application Stage Setting
This is to determine whether the application is single stage or multi stage. This is important for us to know as we will configure the integration differently for each type.
To check, please follow the steps below:
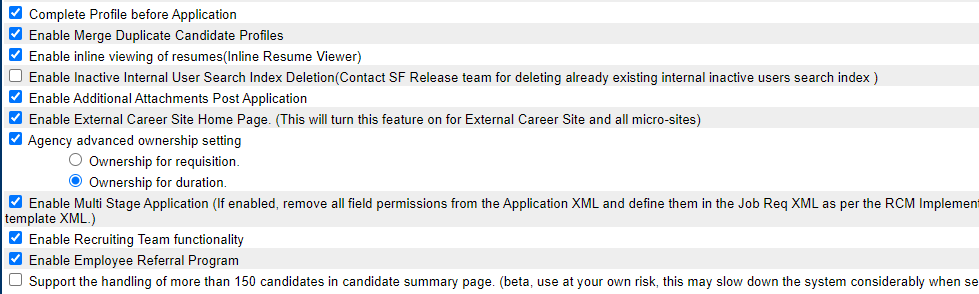
- Go to your Provisioning site and click “Company Settings“.
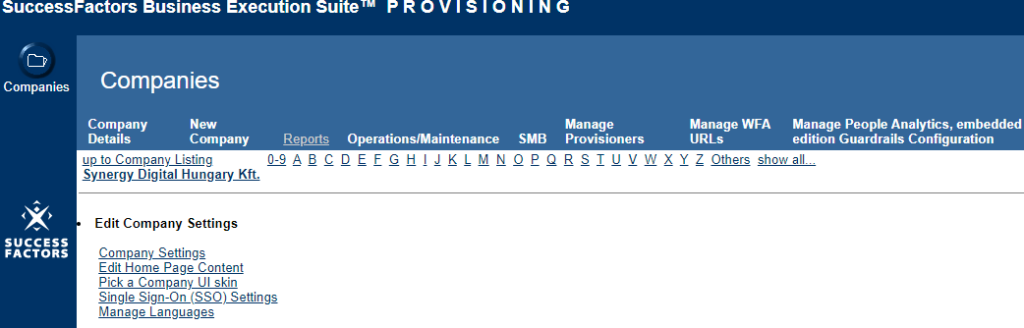
- Search for the option “Enable Multi Stage Application” to check whether this is ticked.
- Please confirm whether this option is enabled, but do not make any changes here.
- If the option is not ticked, then the application will be single stage.
Step 7: Privacy Policy URL
We are able to show your Privacy Policy URL to candidates on the application form, to enable them to view this before they submit their application.
Please provide this in a URL format and send with the other information requested in the Requirements section.
If you do not share a Privacy Policy URL, we will show a generic message to all candidates instead.

Step 8: Candidate Visibility Status
We are able to default this value based on your requirements, to ensure candidate visibility is not impacted for system users. This option controls:
- Candidate searchability in Recruiting > Candidates
- Forwarding candidates to other requisitions and colleagues
There are 3 options we can default to:
- Only Recruiters managing jobs I apply to
- Any company Recruiter in my country of residence
- Any company Recruiter worldwide
Our default setting is 1 if not specified otherwise. This means that the candidate will not enter the Talent Pool and the candidate’s data will only be handled by the direct recruiter.
Please confirm which option you would like us to use when you send us the other information requested in the Requirements section.
Requirements Revisited
You should now have all the following information after processing the steps above:
- Link to log in to SAP test platform
- Link to job requisition in SAP test platform
- API Key for OAuth2.0 (see step 2)
- Copy of the following Recruiting Templates: (see step 3)
- Candidate
- Job Application
- Job Requisition
- Confirmation of IP Whitelist (see step 4)
- Job Application Source value (see step 5)
- Application Stage Setting (see step 6)
- Link to Privacy Policy (see step 7)
- Candidate visibility preference (see step 8)
Please send the above information to one of the following contacts, depending on your job board:
| Country | Job Board | Contact Email Address |
| Continental Europe | Stepstone DE | connect@stepstone.com |
| UK | Totaljobs / Caterer / Jobsite | connectuk@thestepstonegroup.com |
| Ireland | Irishjobs, Jobs.ie, NIJobs | connectuk@thestepstonegroup.com |
Once we have received the above information, we will proceed with testing.
Testing Process
Testing Instance
We advise to test in your preferred instance, before moving into Production i.e Staging or Valhalla.
We are happy to defer to you on this and are flexible whichever you choose.
We require you to follow all the above steps in your chosen instance to enable implementation.
End-to-end test
Once we have the necessary information from the requirements above, we will follow the steps below:
- Configure the integration within our internal system.
- Set up a test job, using the job requisition URL provided.
- This will be set up on a test account and not use your account credits.
- Apply for the job as a candidate.
- Test the screening questions are pulling through correctly, by cross-referencing with the SuccessFactors careers apply page.
- Send an application into SuccessFactors.
- Advise application has been sent and ask you to confirm that the application and source has come through as expected.
Considerations:
- If we have any issues throughout this process, we will feedback to you in the first instance.
Go Live
Once testing has been completed in all instances, we will await your confirmation to go live with the integration.
At this point, we will turn this on for all live jobs on your account.